Understanding Weathering Diecast Vehicles
Weathering diecast vehicles is the art of adding realistic wear and tear to model cars, trucks, and other vehicles, replicating the effects of real-world conditions. This process involves applying various techniques to simulate the appearance of rust, dirt, dust, fading, and other signs of aging. The goal is to transform a pristine model into a more lifelike representation of a vehicle that has been exposed to the elements. Weathering diecast cars takes your models from looking like toys to looking like miniature versions of the real thing, adding depth, character, and a sense of history. This process is popular among hobbyists and model enthusiasts who are looking to elevate the level of realism in their collections. By mastering weathering techniques, you can create truly stunning and believable models.
The Importance of Weathering for Realism
Weathering is critical for achieving realism in your diecast car models. Without weathering, a model can appear too perfect and artificial. Real vehicles are constantly subjected to environmental factors that leave their mark. Sun, rain, wind, and dirt all contribute to the aging process. By replicating these effects, you provide a more authentic visual experience, making your models more engaging and visually interesting. Weathering adds depth, dimension, and a sense of history to your models. It tells a story about the vehicle’s use and its journey through time. It makes a model more than just a static representation; it gives it personality and character, enhancing its overall appeal. Whether you are a beginner or an experienced modeler, weathering can significantly improve the appearance of your collection.
Essential Tools and Materials for Weathering

To begin weathering your diecast cars, you’ll need to gather the proper tools and materials. The quality of your tools will impact the result. Start with a dedicated workspace with good lighting. This will help you identify areas for improvement. Some of the most useful items include an airbrush, various weathering powders, washes, solvents, brushes, and masking tape. Investing in quality supplies will help you create a better result. It’s important to choose products specifically designed for scale modeling. These are often designed to work together to achieve optimal results. Proper preparation and selection of the right materials will set you up for success.
Airbrush and Paint
An airbrush is a versatile tool for applying paint and weathering effects evenly. It’s essential for techniques like creating faded paint effects, subtle dust layers, and overall color variation. Choose an airbrush with a fine nozzle for detailed work. When selecting paints, opt for acrylics specifically designed for scale models. These paints are easier to control, dry quickly, and offer a wide range of colors. Thin your paints appropriately to achieve smooth, even coats. Experiment with different paint combinations to replicate the effects of sun damage or wear on the surface of the vehicle. Proper airbrushing technique requires practice, but it’s one of the most effective ways to achieve realistic weathering results.
Weathering Powders
Weathering powders are finely ground pigments that add texture and depth to your models. They are perfect for simulating dust, dirt, and rust. The powders are available in a wide range of colors, including rust, earth tones, and various shades of gray. Apply powders using soft brushes or by gently tapping them onto the model. You can experiment with different shades to build up layers of weathering. Use a setting solution or a clear coat to fix the powders and prevent them from being rubbed off. This technique works well on all surfaces. Consider applying different colored powders to different parts of the vehicle to replicate the effects of dirt and weathering on the real thing. When properly used, weathering powders can dramatically improve the realism of your diecast models.
Weathering Washes and Solvents

Weathering washes are thinned paints used to add shading, highlight details, and create a sense of depth. They are applied over the entire model or selectively to specific areas. Solvents help to thin and manipulate the wash. They enable you to remove excess paint and blend the weathering effects. Common solvents include enamel thinners or specific weathering solutions. Apply the wash to the model and let it settle into recesses and crevices. Then, remove the excess with a clean brush or a cotton swab. Different colors of wash can simulate dirt and grime. These techniques are excellent for adding realism and detailing the vehicle’s surface. Experiment to find techniques that you find enjoyable, and make the models look like something out of the real world.
Top 5 Weathering Techniques for Diecast Cars
Technique 1 Dry Brushing
Dry brushing is a simple but effective technique for adding highlights and simulating worn edges. It involves dipping a dry brush into a small amount of paint and wiping off most of the paint on a paper towel until the brush is nearly dry. Then, lightly brush the bristles over the raised details or edges of the model. This will create the illusion of paint wear. It’s an excellent technique for highlighting details, adding depth, and simulating wear and tear. Use different colors of paint to represent various forms of paint wear. Dry brushing adds character and realism, making your models more engaging. It is a basic technique that is easy to master, yet highly effective.
Applying Dry Brushing Technique

To apply dry brushing, start by selecting a brush with soft bristles. Use a color that complements the base coat of your diecast model, such as a lighter shade for highlights or a darker shade to simulate shadows. Dip the brush in the paint and wipe off most of it on a paper towel until the brush is almost dry. Then, apply the brush lightly over raised surfaces, edges, and details, creating a subtle texture. This technique works best on textured surfaces. Repeat the process multiple times with different colors to achieve the desired effect. By carefully building up layers of paint, you can create realistic wear and tear. Practice and patience will refine this technique.
Technique 2 Washing
Washing is a technique used to enhance the details and add depth to your diecast models. It involves applying a thin, diluted paint to the model’s surface. This allows the paint to settle into recesses, panel lines, and crevices. Use an enamel or acrylic wash in a color that contrasts with your model’s paint, such as a dark brown or black for a light-colored vehicle. The wash adds shadows and depth and brings out the details. Washing is an essential technique for adding realism and is relatively simple to execute. Experiment with different colors and techniques to find what works best for your models.
Applying Wash to Diecast Cars
To apply a wash, thin your chosen paint with a solvent or thinner, making it very fluid. Apply the wash to the model using a small brush, allowing it to flow into the panel lines, grooves, and details. Let the wash sit for a few minutes, then remove the excess paint with a clean brush or cotton swab. Wipe in the direction of airflow. The wash will remain in the recesses, highlighting the details. You can also use the wash to create shadows and accentuate the shape of your model. This technique adds realism and helps to tell a story. The wash will give the impression that your car has a history and has been exposed to the elements.
Technique 3 Rust Effects

Creating rust effects on your diecast models is a key technique for adding realism, especially if you are depicting a vehicle that has been exposed to harsh conditions. Rust can be simulated using various techniques. These include weathering powders, pigments, and specialized rust effects paints. You can create rust by applying various techniques. These techniques include using weathering powders or a combination of paints. Each will produce a unique look. The choice of technique depends on the level of detail and realism you want to achieve. This weathering process adds depth and character to your models.
Creating Rust Effects
One way to create rust effects is to apply weathering powders in various shades of orange and brown. Apply these powders directly to the model. Then, use a brush or sponge to stipple the powders onto areas prone to rust, such as the lower body panels, edges, and around details. You can also mix weathering powders with a clear solvent. Paint these mixtures onto the model, concentrating on areas where rust is likely to accumulate. Use rust-colored paints. These paints can be applied with a brush, airbrush, or sponge to create a more pronounced rust effect. Building up layers of rust effects over time will improve realism.
Technique 4 Streaking Grime
Streaking grime simulates the effect of dirt, oil, and grime running down the surfaces of your models. It adds vertical streaks and textures. This technique is especially useful for creating a weathered look on vertical surfaces like the sides of a vehicle. The key to successful streaking is to use paints specifically designed for this purpose. You can also use enamel washes, or oil paints thinned with odorless solvents. Streaking grime adds a sense of realism and is important if you are working on a military or off-road vehicle.
Applying Streaking Grime to Diecast Cars

To apply streaking grime, use a brush. Start with a slightly thinned paint. Apply vertical streaks down the model’s surface, concentrating on areas where dirt would naturally accumulate. Use a clean brush dampened with thinner. Gently blend the streaks to create a more natural look. The streaking effect should be subtle. Avoid applying too much paint at once. Work in layers to build up the desired effect. Vary the colors and intensity of the streaks to add visual interest. Start from the top of the vehicle and work your way down to create the illusion of flow. This simple technique can transform the appearance of your models.
Technique 5 Dust and Dirt Effects
Dust and dirt effects are crucial for creating a realistic environment for your diecast models. These effects simulate the accumulation of dirt and dust on the vehicle’s surfaces. The effects will vary depending on the environment. You can simulate these effects using various weathering powders and pigments. The selection of the correct color depends on the context of your vehicle. Using these techniques, you can add layers and textures that will help your vehicle stand out from the crowd. This technique adds a realistic final touch to your models.
Applying Dust and Dirt Effects
To apply dust and dirt effects, start with a base coat of dust-colored weathering powder or pigment. Apply the powder or pigment to the model using a soft brush or sponge, concentrating on the lower parts of the vehicle and areas where dust would naturally settle. You can apply multiple layers to build up the effect. You can also use washes to add depth and variation. Apply a wash to the model, letting it settle into crevices. Then, remove the excess with a clean brush or cotton swab. Seal the weathering effects with a matte clear coat to protect them and give your models a final finish. You can simulate mud splashes, giving your model a realistic look.
Protecting and Finishing Your Weathered Models

Sealing the Weathering Effects
Once you’ve applied your weathering techniques, it’s essential to seal the effects to protect your hard work. Use a matte clear coat spray designed for model making. The clear coat will protect the weathering from being rubbed off. Apply the clear coat in thin, even layers. Allow each layer to dry completely before applying the next. This helps to prevent runs and pooling. Sealing the weathering effects will also give the model a unified appearance and enhance the overall realism. This is an important final step in the weathering process.
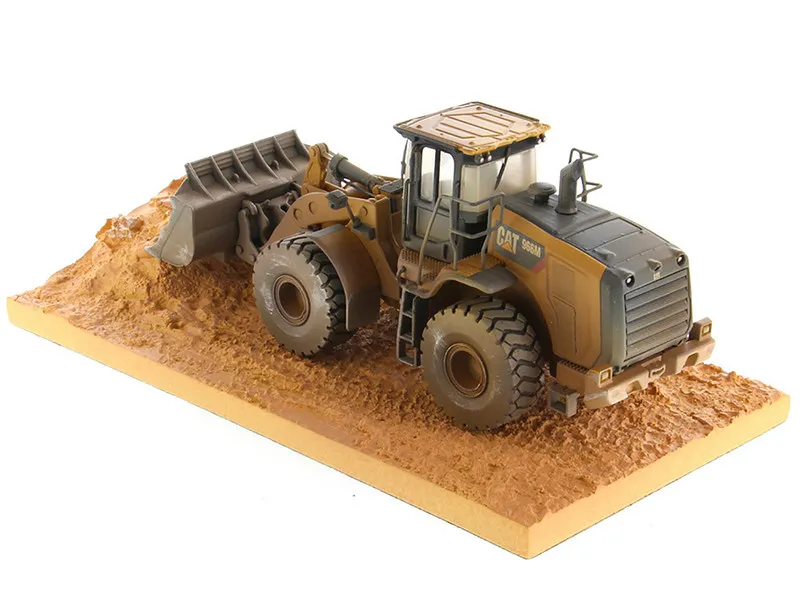
Displaying Your Weathered Diecast Cars
Displaying your weathered diecast cars is the final step. Displaying them in a diorama or setting that complements the weathering effects will enhance their visual impact. Create a scene that tells a story about the vehicle. Use materials like dirt, rocks, and foliage to create a realistic environment. Consider the lighting, and position your models to highlight the weathering details. Take photos of your models. Sharing your work with other modelers can also provide a feeling of satisfaction. By displaying your weathered models creatively, you can showcase your skills and add depth and character to your collection. This will enhance the overall appeal.