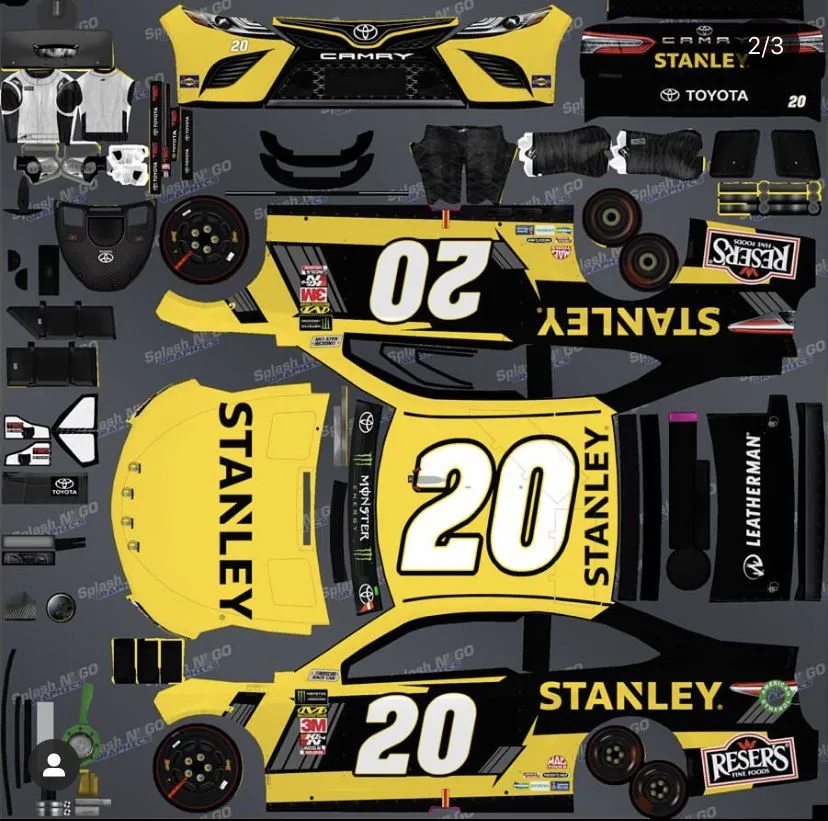
Understanding Nascar Diecast Templates
Nascar diecast templates are essential tools for anyone looking to design their own miniature race cars. These templates provide a pre-formatted structure, essentially a digital canvas, that mirrors the physical dimensions and features of a diecast model. They serve as the foundation upon which you apply your creativity and design skills, ensuring that your final product accurately reflects your vision. Templates save time and effort by eliminating the need to manually measure and scale designs to fit the intricate shapes of a diecast car. Understanding these templates is the first step to creating professional-looking Nascar diecast models. Without them, your designs might not align correctly, leading to wasted materials and a less-than-satisfactory end result. By using a template, you guarantee that your design will wrap around the car body seamlessly and fit the model perfectly.
Template Formats and Compatibility
Diecast templates come in various formats, each with its own strengths and weaknesses. The most common file types include vector-based formats, such as AI (Adobe Illustrator), EPS (Encapsulated PostScript), and SVG (Scalable Vector Graphics), which are ideal for their scalability and ability to maintain clarity at any size. Raster formats like PSD (Photoshop Document) and PNG (Portable Network Graphics) are also used, especially for incorporating photographic elements or detailed textures. The software you use will dictate which formats you can work with, but most design programs are compatible with multiple file types. It’s crucial to choose templates that align with your design software and your preferred workflow. Compatibility is vital to avoid issues during the design process, ensuring that you can open, edit, and save your designs without any problems.
Common Template File Types
Vector templates (AI, EPS, SVG) are highly favored for diecast design due to their scalability. They allow you to resize your design without losing quality, an essential feature when dealing with complex shapes and intricate details. Raster templates (PSD, PNG) are often used when integrating photographic elements or highly detailed textures into the design. Although raster formats can be edited, they are resolution-dependent, meaning that enlarging them too much can lead to pixelation. Therefore, it is best to begin with the right resolution. Understanding the strengths of each file type will enable you to choose the most appropriate format for your project and make the most of your design software.
Software for Nascar Diecast Design
Selecting the right software is crucial for a smooth and effective diecast design process. Popular choices include Adobe Illustrator, known for its powerful vector editing capabilities; Adobe Photoshop, perfect for raster-based designs and photo manipulation; and CorelDRAW, a versatile alternative to Illustrator with its own strengths. Free or open-source options, such as Inkscape, also provide robust design tools and are compatible with a wide variety of diecast template formats. Each software program offers a unique set of tools, and your choice will depend on your design experience, the complexity of your projects, and your budget. Familiarizing yourself with the features of different software will help you identify the ideal tools for your creative endeavors.
Selecting the Right Software
Consider your design needs and experience level when choosing software. Vector-based programs are best if you need scalable designs, precise lines, and easy editing of shapes and text. Raster-based programs excel at photo editing, texture creation, and realistic effects. If you’re new to design, start with a user-friendly program that provides tutorials and support. If you’re more experienced, you can explore more advanced features and complex workflows. Consider the software’s compatibility with template file formats, and the available tools for color management, text handling, and graphic manipulation. The ideal software will not only meet your current needs, but also provide you with the tools to grow and develop your design skills.
Top 5 Design Secrets for Nascar Diecast Templates

Secret 1: Color Palette Mastery
Mastering color palettes is one of the most important secrets to exceptional diecast design. The colors you choose can significantly impact the overall look and feel of your design. Understanding color theory helps you create harmonious and visually appealing designs. Use the color wheel to identify complementary, analogous, and triadic color schemes. Consider the brand identity of the car; the color scheme should reflect the team’s or driver’s branding. Experiment with different colors, and use online tools or software features to see how your color choices look together. A well-chosen color palette will not only attract attention but will also communicate the right message about the car and its sponsor.
Importance of Color Theory
Color theory is the foundation for understanding how colors interact and affect perception. It involves the study of color relationships, such as hue, saturation, and value. Knowing the basic principles of color theory helps you create visually appealing designs. For example, complementary colors (those opposite each other on the color wheel) create high contrast, while analogous colors (those next to each other) create a sense of harmony. Understanding how these color schemes work will make your designs pop. When designing a diecast, consider how the colors will be perceived on a small scale and choose colors that will stand out on a shelf. Using color theory effectively is essential for achieving professional-quality results and creating designs that capture attention.
Choosing the Right Colors for Brand

When designing for brands and sponsors, the color choices must align with the brand’s identity. Always refer to the brand’s color guidelines or style guide. Consistency is key to maintaining a strong brand presence. If a team or sponsor has a specific color palette, use those colors in your design. Incorporate the brand’s colors in the logo, the car’s body, and other design elements. Avoid using colors that clash with the brand’s image. It’s important to conduct research, or ask the sponsor what colors and images are associated with the brand. The right colors will help reinforce the brand’s recognition and contribute to the overall success of your design.
Secret 2: Precision and Detail
Attention to detail is paramount in diecast design. The ability to create accurate and precise designs sets professional designers apart from amateurs. Every line, curve, and element should be placed with care. Use your design software’s features to ensure accuracy. Pay close attention to measurements, alignment, and proportions. Consider how the design will look on the 3D surface of the diecast. Make sure the lines are clean, the graphics are clear, and the text is legible. This level of detail will not only enhance the visual appeal but will also convey professionalism. Accurate designs result in a finished product that looks crisp, polished, and true to your vision.
Creating Accurate Designs
Accuracy starts with the template. Ensure that you are using a high-quality template that matches the specific diecast model. When working with templates, pay close attention to measurements and dimensions. Use the grid and guidelines features in your design software to maintain alignment and proportions. Check your design at different zoom levels to identify any imperfections or inaccuracies. Always double-check your measurements and verify that all the design elements are correctly sized and placed. Consider how the design will wrap around the curved surfaces of the car and plan accordingly. By creating accurate designs, you will ensure that the final product looks professional and reflects your commitment to detail.
Working with Dimensions and Scale

Understanding dimensions and scale is crucial for creating designs that fit perfectly onto the diecast model. Diecast models come in different scales (1:64, 1:24, etc.), and your template must correspond to the scale of your model. Always verify your measurements to make sure your design elements fit. Use your design software’s scale tools to ensure that all elements are proportionally correct. When incorporating logos, text, or graphics, ensure that they are the correct size and will fit within the intended areas. Before finalizing your design, it is always a good idea to test a small portion of your design on the diecast to be sure. This will give you a clearer idea of how your design will appear on the finished product. Careful attention to scale and dimensions will ensure that your design looks professional and fits the model accurately.
Secret 3: Font Selection and Placement
Font selection and placement can significantly impact the visual appeal and readability of your diecast design. Choose fonts that complement the overall aesthetic and branding of the car. Consider the message you want to convey. For race cars, bold and dynamic fonts work well, while more subtle fonts might be more appropriate for sponsors. Ensure that your fonts are legible at the scale of the diecast model. Avoid overly intricate or thin fonts, which can be hard to read. The placement of text is as important as the font itself. Arrange the text in a way that is easy to read and visually balanced. Use hierarchies to highlight the most important information and utilize the space effectively to give your design a more polished look.
Font Styles for Readability
Readability is key. Choose font styles that are easy to read, especially at the small scale of a diecast model. Avoid fonts that are too thin, ornate, or stylized, as they can be difficult to discern. Consider using bold fonts for headings and important information and a more legible font for body text. Test your font choices at the actual size of the diecast to ensure they are clear. Be sure to choose fonts that can be rendered without issue. The goal is to convey information clearly and effectively. Prioritizing readability will ensure that the text on your design is easily understood.
Font Placement and Hierarchy

The strategic placement of text and the creation of visual hierarchies help guide the viewer’s eye and emphasize key information. Use different font sizes, weights, and styles to create a clear hierarchy. Place important information, such as the driver’s name or sponsor logos, in prominent positions. The placement of text should complement the overall design and not distract from it. Create balance. Ensure that the text and other design elements work together harmoniously. Avoid overcrowding. Ensure that there is enough space around each element to make it easy to read. Proper font placement and hierarchy will make your design more engaging and professional.
Secret 4: Incorporating Logos and Graphics
Incorporating logos and graphics is essential for creating visually compelling diecast designs. When using logos, always use high-resolution versions to ensure that they look crisp and clear. Make sure the logos are accurately positioned and scaled according to brand guidelines. Graphics should complement the overall design and enhance its visual appeal. Choose graphics that are relevant to the brand, driver, or sponsor. Consider the colors and styles of the graphics and make sure they align with the design. Use your design software’s tools to manipulate and adjust graphics to fit your design. With careful planning, you can integrate logos and graphics to create visually striking and effective designs.
Vector vs Raster Graphics
Understanding the difference between vector and raster graphics is vital for diecast design. Vector graphics, such as those created in Adobe Illustrator, are based on mathematical formulas and are scalable without losing quality. Logos are best created as vector graphics to maintain sharpness regardless of size. Raster graphics, such as photos, are based on pixels and can become pixelated when enlarged. Therefore, make sure the resolution of the original image is high enough for use on the diecast. Choose the right type of graphic. For logos and other elements, use vector graphics. When using photographs or textures, make sure they are high-resolution. A clear understanding of the strengths of each graphic type will help you create more impressive designs.
Logo Placement and Branding

Logo placement is vital for branding. Always follow the brand’s guidelines for logo usage. Choose prominent positions for logos to maximize visibility. Use the diecast template to identify suitable placement areas. Ensure that logos are correctly scaled and aligned to fit the contours of the model. Always maintain the correct aspect ratio. Consider the background of the logo and ensure that it contrasts with the background colors. Test logo placement at different angles to make sure the logo is visible from every angle. The goal is to reinforce brand recognition. Proper logo placement and branding is essential for creating professional diecast designs.
Secret 5: Finalizing and Printing
The final steps of the diecast design process involve preparing your design for printing. Before printing, make sure you have all of the necessary files, and consider the print specifications. Your printing company will likely provide you with the file formats they accept and any additional guidelines. Check your design for any errors or inconsistencies. Create a proof to visualize how the design will appear on the final product. Consider the special finishes or materials that may be available. By carefully finalizing your design and preparing it for print, you ensure that the finished product meets your expectations. Attention to detail during this phase is crucial for ensuring the final product’s quality.
Preparing Files for Print
When preparing your design for print, follow the printer’s file format requirements. Common file formats include AI, EPS, PDF, and PSD. Always convert text to outlines or curves to avoid font issues. Provide the printer with all necessary design files, including the template, design files, and any reference materials. Specify the desired colors, finishes, and materials to the printer to ensure the best results. Consider the size and scale. Make sure that your design is the correct size for the model you are using. Verify that all of the elements of the design are in their correct places. Preparing your files correctly will ensure that your design is printed accurately and effectively.
Proofing Your Design

Proofing your design is a critical step in the printing process. Review your design at its actual size to ensure that all elements are visible and readable. Look for any errors. Check for any spelling mistakes, incorrect logos, or misplaced graphics. Verify the color accuracy of your design. If you have specific color requirements, make sure your printer is able to match them. Once you receive your proof, review it carefully to make sure all of the design elements are as they should be. If you find any issues, make any necessary changes. The proofing process ensures that the final product meets your expectations.
Where to Find Nascar Diecast Templates
Finding Nascar diecast templates is the first step to bringing your design ideas to life. Many websites provide templates in various formats for different diecast models. Websites specializing in model car customization often have extensive template libraries. Online marketplaces, such as Etsy and eBay, are also sources for both free and paid templates. When searching for templates, be sure to check the file format, scale, and compatibility with your design software. Before starting your design, it is important to verify that the template matches the specific model you intend to customize. The correct template provides the foundation for a professional result.